DIY Air Quality Sensor
My folks live out in the woods, and are grappling with the the recent wildfires in California that have resulted from the displacement of indigenous peoples, a century of wildfire suppression, and climate change. My Grandpa and Mom are asthmatic, and it’s important for the family to know what the air quality is outside as the many fires burn through the season. The problem is that we can’t say for certain what the air quality is at their exact location, because they live far away from publicly available sensors.
I wanted to make an air quality sensor that could provide real-time data to me and my family on our phones. PurpleAir sensors seem cool, but as of this writing they are $229. I was convinced that I could build something similar for much cheaper.
Because I planned to integrate some more sensors and functionality eventually, I decided to set up a homeassistant server on a raspberry pi, and build a sensor that connected to homeassistant. The result is an extensible, cheap, air quality sensor that my family and I use to monitor air quality from our phones, which can be set to send alerts when the AQI crosses certain thresholds.
This project was heavily based on Pieter Brinkman’s tutorial
Table of Contents
An exhaustive list of all materials used in this project (total = $77, $61 of which is the raspberry pi home server)
Supplies
Tools
- soldering iron #### Sensor
- ESP-32 Board ($3.50)
- DuPont Wires ($3 for a ton) (socket-socket)
- PMS5003 Air Particle Sensor ($10)
- microUSB charger ($1)
- DHT22 Humidity and Temperature sensor ($1.50) #### Raspberry Pi server
- Raspberry Pi 4, 2 GB memory ($45)
- microSD ($8)
- microSD –> SD/USB converter ($8)
- USB-C charger ($8)
The Sensor

Wiring
PMS5003

To connect the PMS5003 you must clip the ends and solder one end of dupont wire onto the wires coming out of the sensor.
Then we connect the other ends of the dupont wires to the corresponding pins on the ESP32 board. Don’t mind the DHT22 humidity sensor yet
DHT22 Humidity Sensor

Wire it up with the socket-socket dupont connectors, no soldering needed here. The picture at the end of the previous section shows what it looks like wired up.
Software
I’m assuming you have a unix system (linux or mac) open Terminal or some other terminal emulator.
I use pip as a python package manager. It should be installed by default with python3
download the esphome package
pip install esphome
Now we’re going to make a .yaml configuration file that will be used to flash the software onto the sensor.
Here’s my air-quality.yaml
esphome:
  name: airquality
  platform: ESP32
  board: nodemcu-32s

# Enable logging
logger:

# Enable Home Assistant API
api:

ota:
  password: ""

wifi:
  ssid: "WIFI NAME"
  password: "WIFI PASSWORD"

  # Enable fallback hotspot (captive portal) in case wifi connection fails
  ap:
    ssid: "Airquality Fallback Hotspot"
    password: "PASSWORD"

captive_portal:

uart:
  tx_pin: GPIO17
  rx_pin: GPIO16
  baud_rate: 9600

sensor:
  - platform: pmsx003
    type: PMSX003
    pm_1_0:
      name: "Particulate Matter <1.0µm Concentration"
    pm_2_5:
      name: "Particulate Matter <2.5µm Concentration"
    pm_10_0:
      name: "Particulate Matter <10.0µm Concentration"
  - platform: dht
    pin: GPIO19 #D19 #D4
    temperature:
      name: "Air quality meter Temperature"
    humidity:
      name: "Air quality meter Humidity"
    update_interval: 60s

switch:
  - platform: gpio
    pin:
      number: GPIO21
    id: pms_set
    name: "Start measuring"

interval:
  - interval: 120s
    then:
      - switch.turn_on: pms_set
      - delay: 20s
      - switch.turn_off: pms_set
esphome air-quality.yaml run
It compiled, but I received the following error
INFO Successfully compiled program.
INFO Resolving IP address of barntank_sensor.local
ERROR Error resolving IP address of barntank_sensor.local. Is it connected to WiFi?
ERROR (If this error persists, please set a static IP address: https://esphome.io/components/wifi.html#manual-ips)
ERROR Error resolving IP address: Error resolving address with mDNS: Did not respond. Maybe the device is offline., [Errno 8] nodename nor servname provided, or not known
After about an hour of trouble shooting I realized it was because the microUSB cable I was using does not transfer data, it only charges devices, which is the case with some cheap cables. After replacing the cable with another microUSB I had lying around, it worked.
It’s gonna compile and take a few minutes. When prompted, select the option to flash over ‘serial’ i.e. USB.
If you change the configuration and flash it again you can use the following command to flash it over wifi
esphome water.yaml run --upload-port XX.XX.XX.XX
where xx.xx.xx.xx is the IP address of the sensor (the IP of the sensor is reported after you flash it over USB the first time. Might be worth writing it down.)
Flash/update the software on the sensor as often as you change the .yaml configuration. Now the sensor should be set up
Homeassistant Server
This part is pretty easy, but opens up pandora’s box. There are so many things you can do. But to integrate our sensor it’s pretty easy.
So we’re gonna install Home Assistant on a raspberry pi 4. You can install Home Assistant software on a bunch of different machines/computers, but raspberry pis are cheap and effective.
You’re going to start by taking your microSD card and using the microSD converter and plugging it into your computer.
Once you’ve got the microSD in, follow this tutorial for installing Home Assistant. It says to use Balena Etcher but you can also use Raspberry Pi Imager, which is what I used.
Once you set up home assistant it may tell you that there is a device discovered. If not, you can add it manually under Settings > Devices & Services > Add Integration > ESPHome
Enter the ip address of the sensor under in the ‘host’ field.
And now it’s added!
Go to the Overview dashboard tab in the sidebar.
Edit the dashboard by clicking the pencil in the top right
Click Add Card in the bottom right
Search by entity
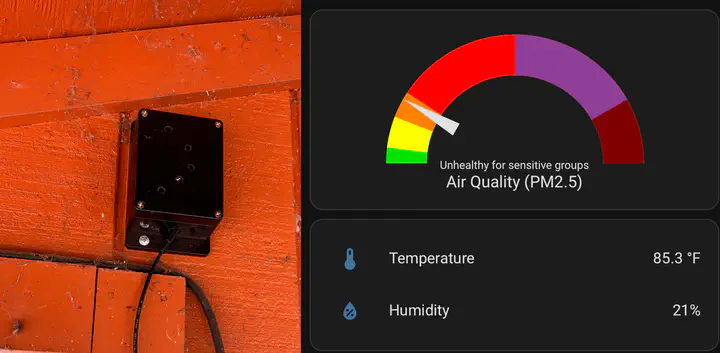
I use the following custom card configuration to show PM2.5 as AQI categories
type: gauge
entity: sensor.particulate_matter_2_5um_concentration_2
needle: true
min: 0
max: 300
segments:
  - from: 0
    color: '#00e400'
    label: Good
  - from: 12
    color: '#ffff00'
    label: Moderate
  - from: 35.5
    color: '#ff7e00'
    label: Unhealthy for sensitive groups
  - from: 55.5
    color: '#ff0000'
    label: Unhealthy
  - from: 150.5
    color: '#8f3f97'
    label: Very Unhealthy
  - from: 250.5
    color: '#800000'
    label: Hazardous
name: Air Quality (PM2.5)
You can edit a card in the dashboard and click Show code editor in the bottom left and paste it in
Conclusion
I put it in a box and drilled some holes in it and mounted it on the side of my grandparent’s shed. So far so good.

